Ok, for my first tutorial I am going to go with the increasingly popular Lomo Style Cross Processing. I am using Photoshop CS3 for this and all upcoming tutorials, so keep this in mind if you have an outdated version of Photoshop. Most things I will do will be applicable in all versions of photoshop but I can not say all will be. So let's get into it!
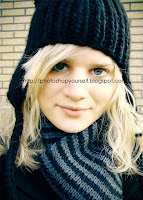
First, find a photo. For this tutorial I'm going to use the helping hand of http://www.sxc.hu for it's vast stock photography and choosing a photo of a girl I have named Jordan. (I have no clue who she is or what her name is.) Onward, we march! This effect works will with head shots and busts, some minor tweaking is necessary for outdoor photos but rarely anything drastic.

Duplicate the layer, very easy no photo necessary.
Go to Filter>Distort>Lens Correction
Vignette Amount -50
Vignette Midpoint +50
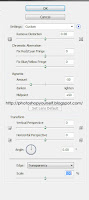
It will look like this.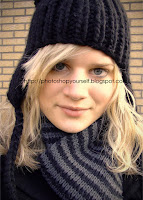 Go to Image>Adjustments>Curves
Points:
55, 55
121, 159
191, 222
255, 255

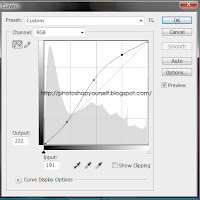
Your image will now look like this.
 Duplicate this layer
Go to Image>Adjustments>Levels
Click off the RGB and go to the RED LEVEL only.
Input 55, 1.0, 255 as values
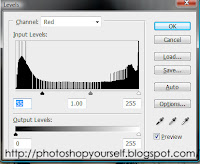
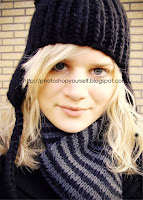
Your image will now look like this.
 Merge all visible layers
(Right Click in your layers pallet on an image and Go to the bottom.)
Go to Image>Mode>Labcolor
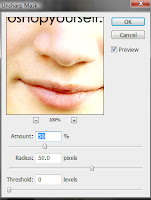
Go to Filter>Sharpen>Unsharp Mask
Amount 50%
Radius 50 Pixels
Threshold 0
Go to Image>Mode>RGB and Save!
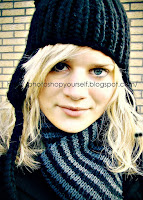
Here's your final product!
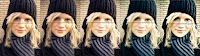
And here is a progression!
src="http://pagead2.googlesyndication.com/pagead/show_ads.js">
First, find a photo. For this tutorial I'm going to use the helping hand of http://www.sxc.hu for it's vast stock photography and choosing a photo of a girl I have named Jordan. (I have no clue who she is or what her name is.) Onward, we march! This effect works will with head shots and busts, some minor tweaking is necessary for outdoor photos but rarely anything drastic.

Duplicate the layer, very easy no photo necessary.
Go to Filter>Distort>Lens Correction
Vignette Amount -50
Vignette Midpoint +50

It will look like this.
 Go to Image>Adjustments>Curves
Points:
55, 55
121, 159
191, 222
255, 255

Your image will now look like this.
 Duplicate this layer
Go to Image>Adjustments>Levels
Click off the RGB and go to the RED LEVEL only.
Input 55, 1.0, 255 as values

Your image will now look like this.
 Merge all visible layers
(Right Click in your layers pallet on an image and Go to the bottom.)
Go to Image>Mode>Labcolor
Go to Filter>Sharpen>Unsharp Mask
Amount 50%
Radius 50 Pixels
Threshold 0

Go to Image>Mode>RGB and Save!
Here's your final product!

And here is a progression!

src="http://pagead2.googlesyndication.com/pagead/show_ads.js">
2 comments:
Thanks for the tutorial. I love this look. One thing tho. After you go into LAB Color mode, you should select the lightness channel befor running Unsharp Mask. Otherwise there's really no point of going into LAB at all.
Thanks again! Love the tutorial!
Dan, thanks for the comment. This is what I did and I just realized I didn't add the step. Hopefully people are as intuitive as you.
Post a Comment